Pixel Art Outlines Tutorial
posted by skeddles in articles 5 0Outlines are an important part of pixel art, especially in cartoony styles like mine. Here I’ll share all my tips and tricks to making them work for you.
Why use outlines
Yes, outlines are not required for pixel art, but you may have noticed they are pretty common, especially in sprites. There are a few good reasons to use them.
Outlines help separate objects from the background, as well as other objects. This is used in many games to keep the characters from blending in to the background so the player can more easily keep an eye on them. It’s especially important in pixel art because of the small palettes. If an object shared a color with something behind it, they would blend together, making it harder to figure out what you’re looking at.
Single Pixel Wide Outlines
The most basic line in pixel art is a single pixel wide. This is easy to draw when the line is going straight up and down, or left and right, but diagonals and curves take a little more skill.
The trick to make the segments of the line only connect diagonally. This may seem like it makes the line more broken up, but in a finished piece of pixel art our eyes perceive it as a solid connected line.
Below you can see an example of a line that has been quickly sketched, and one that has been cleaned up manually.
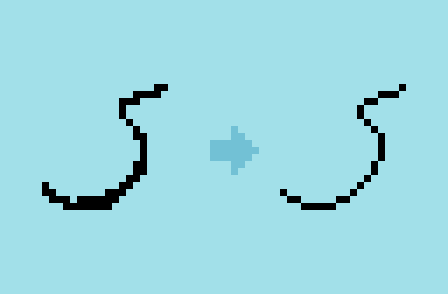
The one on the left has a different thickness at different points, it has edges that appear sharp or pointed where they shouldn’t. It looks sketchy and fat. The one on the right (which has been cleaned up) has a consistent thickness, and smooth curves. All of the extra pixels have been removed, and only the ones necessary for drawing a connected line are left.
This is the thinnest a single-color completely-connected line can be. You can of course make your outlines thicker, or even use techniques to make them look thinner (more about this in part 2), but this is the most commonly used outline for pixel art.
It’s common to draw a line in a messy fashion, where it may look like the line on the left, and then clean it up after by zooming in and removing pixels along the edge until the line segments only connect at the corners. This way you can sketch out bigger shapes first, and then do the hard work of making them consistent and clean after you are sure they are in the right place.
Diagonal Lines
When pixelling straight diagonal lines, there’s one simple rule to follow: it should be made up of identical line segments.
In other words, the line should actually be made up of a bunch of smaller lines that are the same length.

This can be a hard rule to work within, and you may have to alter your piece to make it work, but not doing this creates jaggy looking lines that don’t accurately depict what you’re trying to show. Break this rule only when you have to.
Curved Lines
Drawing curves follows a similar theory to drawing diagonal lines. This will let you draw circles that look perfectly round, and not bumpy.
The easiest place to start is cirlcles. Like in straight lines, you’ll have to pay attention to the length of each line segment. Instead of making them all identical though, you will put the biggest ones on the top, bottom, left and right of the circle, and they will gradually get smaller towards the middle.
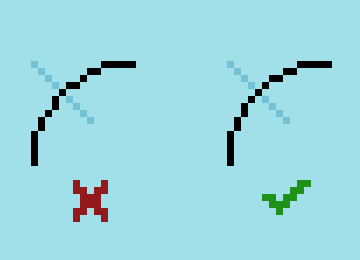
You can see in this example, the line segments on the top of this circle are the longest (7 pixels), and then 2 pixels, and then 1 pixel in the middle.

Here’s a counter example, the lengths go 5, 2, 1, 2, 1 (left), but instead should go 5, 2, 2, 1, 1 (right). You can see not doing this gives the line a little lump in the middle.
Unfortunately, most graphics programs will draw circles the wrong way, because technically it’s more correct mathematically. But who cares about math, right? We’re artists, our job is to make it look good.
Once you get used to pixelling circles, you should be able to apply this to any curved lines in your piece.
Corners
Outlines have the power to change the shape of your object, especially on corners. On corners, you can break the rule about only connecting diagonally in order to create a point. Check out how just changing the corner on this shape controls how it looks. This is something you have to keep in mind while outlining.

Where To Outline
Not every part of your object needs to have an outline. One common technique is to only put an outline on the outside of your object. This lets your object maintain contrast with the background, but can save space and increase clarity of the details within.
Here is an example with internal outlines (left) and without internal outlines (right):

You can see that an outline is not always needed, for example you can still clearly see the hair and head are separate objects, even though there’s no line. But in some places where there isn’t enough contrast (or possibly none), you’ll still have to add a line, such as between the head and neck.
Another common place to forego outlines is where your object touches another. The most common place this is used is the bottom of an object that’s resting on the ground.

Here on this character there is no outline where her hand is touching the stick she is holding, or on the bottom of her feet. Not doing this can sometimes make the object feel like it is floating and not actually touching the ground / other object.
You can also extend the external outlines into the sprite to give it a little more separation:

This suggests to the viewer that there is definitely separation between these two objects (such as the hair and head), but without filling all that space with black lines. You just need to draw enough of the line to suggest the separation. Like in all aspects of pixel art, you don’t need to draw everything, just enough so the viewer gets the idea.
You can use all of this in varying degrees, it ultimately depends on the sprite, the background, the palette, and your personal taste.
When To Outline
Once you know how to draw your outlines, you need to think about when to draw them. Some artists completely draw the outline first (called line art), and then fill it with color. I find that it’s it’s easier to create shapes and add the outlines on afterwards, especially on small sprites. It helps you think of the actual shape of what you’re drawing more. But this also depends on your technique, I prefer to pixel like I’m painting, being very loose and messy and then cleaning it up afterwards. I typically incorporate adding the outlines in the cleanup process, adding detail and fine-tuning the shapes. That means that I never draw messy outlines. Here’s an example:

Notice how I tweaked the shape a little to better fit the outline.
I hope you know understand how to draw clean, smooth outlines in pixel art.
Part 2: Pixel Art Outlines Part 2: Using Color
Thanks for reading this article! Let us know what you thought in the comments below.
